You know that moment?
The one right after you admire your fine paint job…and right
before you pick up your wax brush?
Do you get a knot in your stomach because you’re afraid of
the Wax?
Using Clear and Dark wax needn’t cause you anxiety, but
there is definitely a bit of a learning curve!
Pull out an old board to paint and wax, and follow along…
First, the basics:

Annie Sloan Paint and wax are meant for one another.
Trust me on this.
I’ve tried other waxes over painted furniture, and it never ends well.
OK, so maybe it doesn’t end in the horrific demise of the piece being waxed, but it certainly never looks as rich and lustrous
as when I use Annie Sloan Wax.
Trust me on this.
I’ve tried other waxes over painted furniture, and it never ends well.
OK, so maybe it doesn’t end in the horrific demise of the piece being waxed, but it certainly never looks as rich and lustrous
as when I use Annie Sloan Wax.
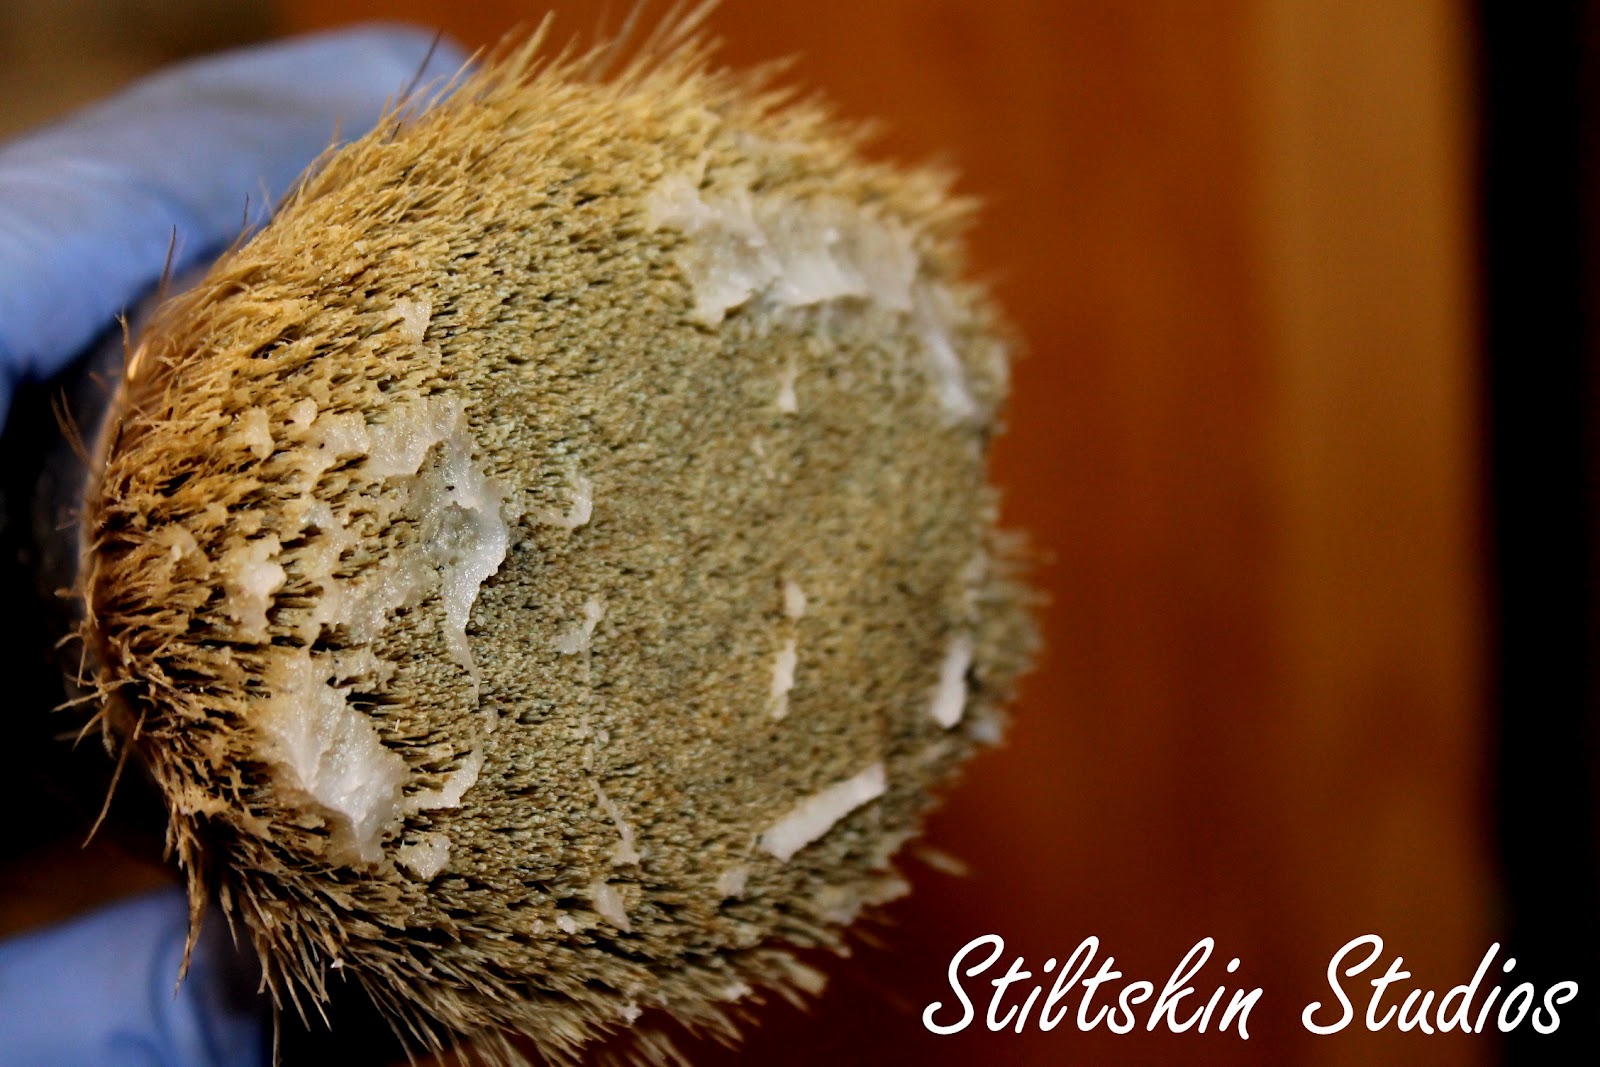
This is about how much Wax I use each time I dip in to the
tin…
there is no need to cover each bristle…
there is no need to cover each bristle…
I like to really swirl it around
in a haphazard fashion…
really working it in as I go
really working it in as I go


This photo (above) shows Pure White with one coat of Clear Wax
Clear and Dark wax are meant to be used in conjunction with
one another
Apply Clear Wax first,
remove excess with an old T Shirt or soft cloth
and follow with Dark Wax
remove excess with an old T Shirt or soft cloth
and follow with Dark Wax
Remember to work in manageable sections…one drawer at a
time, etc.
If you cover the entire piece, by the time you finish,
the area you
started on will have already started to “cure”.
The longer the wax sits, the
harder it is to remove the excess.
Make it easy on yourself!

This is how my Dark Wax looks before I wipe off the
excess…
it’s a thin layer, but you can see I’ve really worked it in to the paint

The photo above shows one coat of Dark Wax applied
over one coat of Clear Wax
over one coat of Clear Wax
(see, nothing to be afraid of! It’s lovely!)

This photo illustrates the outcome if you simply skip ahead
to Dark Wax…
and once you’ve done this, there is no going back (aside from
repainting…)
Sometimes, I like to skip ahead…Dark Wax looks fantastic all by
itself over darker shades such as Emperors Silk, Graphite, and Olive, to name a
few.
If you think you’d like to try using just Dark Wax, I
strongly encourage you to try it out on a sample first!
The beauty of applying the Clear Wax first is that if you
get a little too aggressive with the Dark Wax,
or just don’t want so much Dark
Wax on your item,
you can apply a bit more Clear Wax
and buff away much of the Dark Wax.
you can apply a bit more Clear Wax
and buff away much of the Dark Wax.
A little Clear Wax will go a long way…
if you apply a boatload
(technical term!) of Clear Wax,
you’ll probably remove all your Dark Wax
and
end up spending your time trying to remove
your over-zealous Clear Wax application…
your over-zealous Clear Wax application…
lots of buffing!
That’s it, really…the basics.
1.
Apply Clear Wax-use enough to work the wax into
the paint, but not so much that it’s gloppy and thick. Wipe away the excess.
Now walk away. You heard me. Walk away, get a drink, check your email…let the
wax “cure” for a bit. Overnight is lovely, but if you are like me, that’s not
going to happen. I wait at least 30 minutes.
2.
Apply Dark Wax-again, use enough to cover, but
not so much it’s difficult to remove; a thin coat is plenty. You can always add
more dark wax to certain areas if you so choose. Wipe off excess. Don’t buff, just wipe. This
should not entail a vigorous workout. If it does, you’ve probably been a bit
heavy handed with the wax. Walk away again.
Come back later…like, tomorrow.
3.
Buff the surface, if you desire. Annie
recommends using cheese cloth for this, but a soft cloth or old towel works
well, too. You should be able to buff
the surface fairly easily. If it’s still really tacky and sticky and you’re
having a hard time, use less wax next time.
You might have to put a little muscle into it to get the shine you
desire, but you probably won’t break a sweat.
If dark wax still scares you, you can mix your Dark Wax with
a bit of Clear Wax to lighten it.
I prefer to work with a Wax Glaze.
A Wax Glaze, you ask? Yep. So easy.
You’ll need Dark Wax and some mineral spirits
(you can buy this at any hardware or paint store)
(you can buy this at any hardware or paint store)
I like to use a variety of brushes when working with Wax
Glaze

I save my old Wax tins for mixing Glazes and Colored Waxes
( Just add a bit of the color of your choosing to Clear Wax and like magic, you have Colored Wax. I love Graphite the most.)
( Just add a bit of the color of your choosing to Clear Wax and like magic, you have Colored Wax. I love Graphite the most.)
Some prefer a 50/50 mix of Wax to spirits but I prefer mine
a bit thicker, so my ratio is more like 75/25

On the left, Dark Wax, on the right, Glaze.
You can see the
Glaze is thinner, but not super runny

The Glaze, due to its thinner consistency, really grabs onto
my brush,
but that’s OK since it’s very easy to remove
Glaze is applied in the same fashion as Dark Wax.
You can apply it over Clear Wax or on its own
You can apply it over Clear Wax or on its own
It does tend to “cure” faster and can still be buffed to a
lovely sheen
Here’s my photo step-by-step using Dark Wax Glaze over Clear
Wax

One coat of Provence

One coat of Scandinavian Pink

Clear Wax, prior to removing excess…
notice no huge globs but
all areas are covered
(and yes, I distress prior to waxing…my personal (messy)
preference)

After applying Glaze

After wiping back the excess.
You can see there is still too
much Glaze,
but a rag just isn’t going to do the trick in those nooks and
crannies…
enter the $1 2” chip brush!

It’s cheap and gets the job done!
Used dry and (relatively)
clean,
it works most of the Glaze out of the depressions,
it works most of the Glaze out of the depressions,
making it much easier
to wipe back
(just don’t try painting with these…they are terrible!)

That’s better! Here is the finished product. You can see the
Glaze,
used over the Clear Wax,
used over the Clear Wax,
adds just a bit of definition and depth.
When
you want a softer look (or if Dark Wax scares the bejeezus out of you),
Glaze
is a great option!
I will note, I used to despise working with Wax…Dark in
particular.
My first project with Annie Sloan Paint was done in Old White.
I didn’t know about using Clear Wax, so I just lobbed the Dark on.
I used WAY too much (I was used to working with Glazes)
and did the entire piece before I started wiping back.
By the time I was done, my arms were numb from buffing,
and I called the piece “Café Au Lait”…
that should tell you what color I ended up with…
it sure wasn’t Old White!
I’ve learned much since that first experience.
I read Annie’s books Creating the French Look
and Quick and Easy Paint Transformations
and then I painted and waxed.
A lot.
It took practice and patience,
but I firmly believe NOTHING looks as gorgeous on a piece of furniture.
I read Annie’s books Creating the French Look
and Quick and Easy Paint Transformations
and then I painted and waxed.
A lot.
It took practice and patience,
but I firmly believe NOTHING looks as gorgeous on a piece of furniture.
Now go forth and WAX!
You explained the Annie Sloan Soft Wax beautifully Michele! I could not have said it better myself!
ReplyDeleteThanks, Lisa!
DeleteWonderful post. I love using the dark as a glaze too. I just did it today in fact with Versailles. :)
ReplyDeleteIt's a versatile product, isn't it?
DeleteNice post! I thought I had it down and I STILL learned something!!!
ReplyDeletethanks lady :0)
DeleteGreat post, gotta share! I too prefer to sand/distress before any wax, just don't like the wax globbing up on the sand paper. I'm so thankful I discovered from others about glazing, it's my favorite way to use dark wax and feel I have more control over the depth of the darkness level.
ReplyDeleteI DO still sometimes have problems creating a uniform gloss when doing large FLAT areas. Is there a trick to this?
Norma, thanks for the share. The only time I've experienced this is when I apply with a rag instead of a brush and I miss some spots. Not sure what the answer is for your issue on flat surfaces, although, large, flat surfaces are my least favorite thing to wax!
DeleteMay a video of someone doing a large flat surface would help me. I'd watch it, no matter how long it was.
DeleteWhen you do a large area like this, using the brush and dark, do you do it in sections and wipe after each or go all the way across in wide strips? I really do have issues here. :(
Oops, that was "maybe" a video.
DeleteNorma, do you have a stockist close to you? I'm sure they'd be happy to go over it in person w you...most of them are awesome like that!
DeletePerfect! Just perfect. Thank you.
ReplyDeletethanks for the nice compliment!
DeleteWhat a great tutorial! Thanks for sharing the knowledge!
ReplyDeleteglad you enjoyed it, Kay. I hope it comes in handy!
DeleteThank you for this! Great information! I was scared before to use the dark wax but I love it now.
ReplyDeleteHOORAY! That makes me really happy, Danielle.
DeleteFab-U-Lous. Job!!!!!!!! Can I print and quote your descriptions for our workshops?
ReplyDeleteSasha
ReStyled (chalk Paint (tm) stockist
Thanks Sasha! I'm not affiliated with Annie Sloan products, so I'm guessing they'd prefer you use something more standard.
DeleteOk. maybe, just maybe, I'll open the can of dark wax again. My first experience was similar to yours. Thanks so much for posting step by step :)
ReplyDeleteMariesa, I'm SO glad I persisted. It was one of those situations where I was going to keep at it until I got it down! I would encourage you to keep at it. Don't be discouraged! I'm the first to admit, the wax takes some practice if you're used to top-coats and glazes. Try mixing with mineral spirits to soften and thin it, if that makes you more comfortable...and have FUN!
DeleteThanks so much for all this information..I bought paint, clear and dark wax about 3 months ago and have been afraid to try them. I just might have the confidence now with all these wonderful tips. Thanks for sharing!
ReplyDeleteAWESOME! Go forth and wax, by all means! If you use clear first, you'll be just fine!
DeleteThis is hysterical! I've struggled with dark wax forEVER and knew about the mineral spirits trick but added too much on first attempt. Last night I only added a small amount, THEN discovered the 'brush removal' concept. Bingo!
ReplyDeleteTHEN when done, I see this instruct! LOL If only I knew this before.
Now onto the mix paint/wax concept because I hate 'brown' so I want to 'glaze' with charcoals and greys like Graphite/French Linen. In the past, I've found this mucky/gunky (paint x wax)…. So shall I assume making a colored glaze also involves Mineral Spirits? I shall try this next.
Really tho', I wish someone would make colored waxes other than POOP BROWN.
I also like to sand before wax and glad to hear others do also.
you got it...little bit of mineral spirits, wax, and paint...perfect!
DeleteI sorta love Annie Sloan's "POOP BROWN"...lol. I've tried lots of other colors and always come back to it.
I think my issue with the Poop is I like it with blues/duck egg, old white. When it gets to Paris Grey, despite it being 'blueish' to me, it seems to be the wrong color way. It works…. but what 'doesn't' work for me is when using 'greys'.
DeleteIt just screws up my vibe. I.e.; if I want a cooler feeling piece like bone or grey… it's the wrong 'color'. So I need to start exploring paint/wax mixing.
I tried the mineral spirits, wax AND paint thing, for the very same reason -- I don't love the brown wax on everything. It didn't go so well. I found that the concoction sort of separated. It had a very grainy texture, which I assume was from the mix of paint and mineral spirits.
DeleteThanks for the info on waxing. I needed it!
Kerry
I love using Graphite mixed with clear wax when I want a weathered, sort of Gustavian or Swedish look. I have to admit, I LOVE dark wax over Paris Grey. I agree, it can read blue, and I think it's perfect with the dark brown wax because the warmth counters the coolness of the grey and you end up with the perfect neutral grey shade. Ironically, I don't like it with Duck Egg, because it turns very green to me.. To each their own, right??
DeleteDon't use too much paint when making a colored wax...a little goes a long way! This might be why it's got a funky texture.
I think it was grainy from adding mineral spirits to the wax/paint mixture. I know you can add paint to the wax, but the problem came when I then added mineral spirits. Lisa was talking about mixing all three and, in my experience, it doesn't work. The paint separated, which made made it very grainy. Have you tried mixing the three?
DeleteThanks!
Kerry
Michelle- Lisa here from Sweet South Cottage. Waxing is sometimes challenging. Thanks for all your hard work on this post and thanks for being such a great Chalk Paint(TM)supporter!
ReplyDeletethanks so much, Lisa. I hope this little bit of information encourages everyone that loves chalk paint but is intimidated by the waxing process the confidence to give it a try (or try again, as is often the case!) I really appreciate your support, as well!
DeleteThank you so much for sharing!
ReplyDeleteHere's my other thing….. They say clear wax, then immediately dark. I don't get the concept. In my mind, I want to clear wax, let dry and buff to 'seal the pores'. THEN dark wax on a surface that's a bit more 'slick' so the dark doesn't bite into the clear. Wouldn't that work better for larger flat surfaces to avoid the 'muddy' look?
ReplyDeleteLisa, you should clear wax, wipe off excess without buffing, and let the clear wax sit a bit before you dark wax. I've buffed the clear, then decided to add dark wax after the fact; it made no difference. For us, the best wax to avoid what you're speaking of is to dilute the dark wax, either with clear wax or mineral spirits. Personally, we prefer mineral spirits but either would work!
Deletethank you so much for this tutorial!!! My very first experience with the dark wax was exactly like yours!! :) (I laughed and snorted!) I've gotten better with the application of clear, dark and maybe a again a little more clear.....but I like the glaze idea. That's what I've done in the past with stains. I'm going to pin this and give it a try. looks great! thanks again!
ReplyDeleteUgh!! I used the dark wax over the graphite and i think i have used wayyy to much. I can see an unevenness in the shading.. Can i go over it with a little of the mineral spirits to even it out a bit? When i go to buff at the moment it is very difficult .. ugh..and my paint job was outstanding before the dark wax! !!!
ReplyDeleteif you send me your contact info, I'd be happy to try to help you...M~
DeleteHi,
ReplyDeleteGreat article, thanks, gave me the courage to start waxing! Now hoping you can help a newbie struggling with her first wax job! Paint is graphite and wax looks patchy.
Before I started waxing I had decided to try your glaze (clear wax) as a top coat with some graphite mixed in (sent for Orderless Mineral Spirit from Amazon - I am in UK).
Will the glaze even the 'look' of the waxing out? Or should I do something else?
Toni
Hi Toni, I'd recommend contacting a stockist in your area, or Annie Sloan directly...we're simply end-users, just like you! www.anniesloan.com to find a stockist near you. Good luck!
DeleteI still think of you every time I mix up a dark wax glaze! So much easier for me to work with...thanks, Michele!
ReplyDeleteGreat tips! Do you know if using Chalk Paint (TM)and these techniques would work for painting over painted kitchen cabinets? Or would it be best to stick with latex for cabinets? I would experiment on some small things first as I've not used it before but dying to. Is using the wax necessary to "seal" the finish? Thanks for your help! Dara
ReplyDeleteQuestion - Have you ever used the glaze method with the clear wax? (for the base wax coat) Seems like it might be a good and quicker alternative for things like the decorative area on your frames. I'm getting ready to do a couple of frames that are maybe 3x as ornate as this one. Would love to hear your thoughts on this.
ReplyDeleteThanks so much for the waxing tips - right down to how long to wait between painting / clear waxing / dark waxing. I have only used the dark wax once since beginning to use ASCP and it just turned out okay. Since then, I have been too afraid to try it again because I know that I'm doing it wrong. I kept getting dark brush strokes that won't "smooth" out. I'm visiting my daughter this week and just did a table for her in Provence blue. I applied the clear wax tonight and have been researching dark wax for the last hour. I just came across your blog and am hoping not to be so nervous tomorrow with the dark wax. I was never really sure how long to wait between waxing. Wish me luck and thanks again!!
ReplyDeleteYour waxing tips renewed/restored my faith in ASCP dark wax! Thinning with mineral spirits makes the job so easy and less intimidating. The technique I have discovered which best suits my taste: Working in small areas at a time, apply thin coat of clear wax, wiping off excess with soft t-shirt rag. Then immediately brush on the dark wax/mineral spirits (75/25 ratio) concoction over the still wet clear wax. Wipe off dark wax with t-shirt. This gives a smooth, subtle, dark patina which I prefer on most pieces. Thanks for your great tips!!
ReplyDeleteOh, how i wish I had found you a long time ago! My very first project was a 3 leaf french dining room table! What a mistake!!! Especially when I started with the dark wax! OH LORDIE! I developed muscles I forgot I had! Anyway, I've since fallen into a simple little trick ~ I use very fine steel wool ~ first clear wax, then dark wax and immediately after applying the dark wax, I swipe over the area with the steel wool. Works like a charm! NOW, I'm going to try your mineral spirits recipe! YAY!!! Thanks for the great tips!
ReplyDeleteI have a quick question regarding the wax. Can you use just the wax straight on a wooden frame? I don't particularly want to paint this piece and but wanted to bring the wood out with wax and thought of using the dark wax to show all the nooks and crannies. Will this work?
ReplyDeleteThanks a lot.